Elasticsearch学习笔记
1. Elasticsearch
Elasticsearch是由elastic公司开发的一套搜索引擎技术
1.1 倒排索引
倒排索引的概念是基于MySQL这样的正向索引而言的
1.1.1 正向索引
- 正向索引(Forward Index)通常指的是数据库索引按照字段的自然顺序进行存储和查找的索引方式。在 MySQL 中,常见的正向索引主要是B+ 树索引。
- 当搜索条件为模糊匹配时,由于索引无法生效,导致从索引查询退化为全表扫描,效率很差。
1.1.2 倒排索引
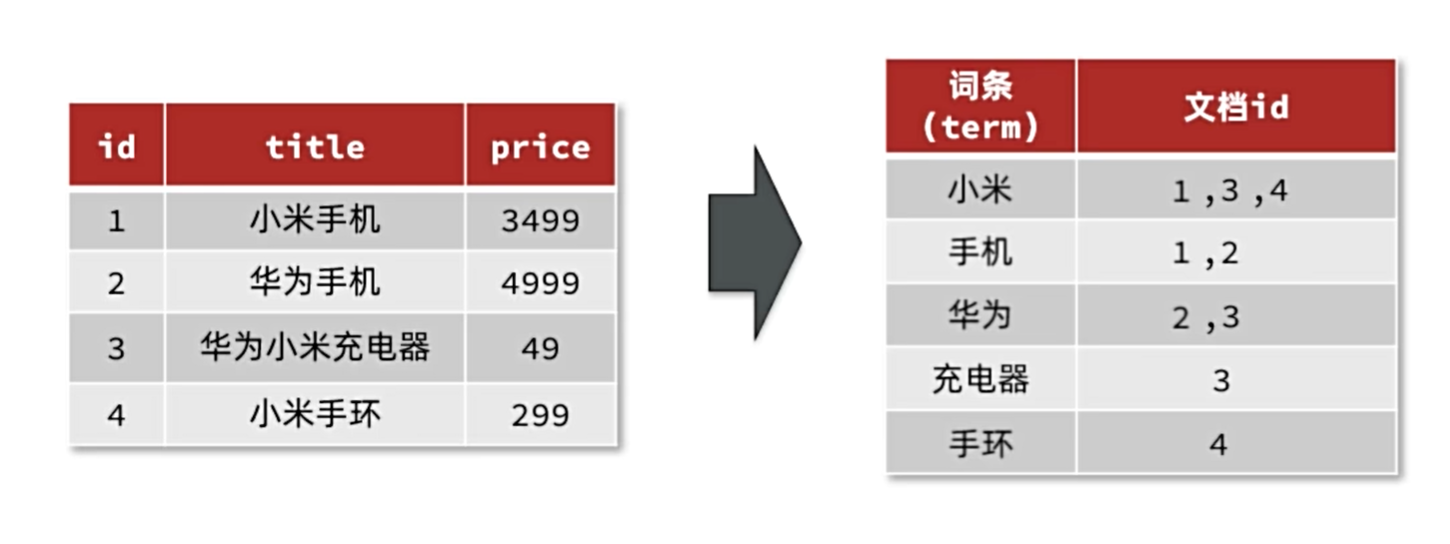
两个概念:
- 文档(Document):用来搜索的数据,其中的每一条数据就是一个文档。例如一个网页、一个商品信息
- 词条(Term):对文档数据或用户搜索数据,利用某种算法分词,得到的具备含义的词语就是词条。例如:我是中国人,就可以分为:我、是、中国人、中国、国人这样的几个词条
创建倒排索引:
倒排索引的搜索流程:
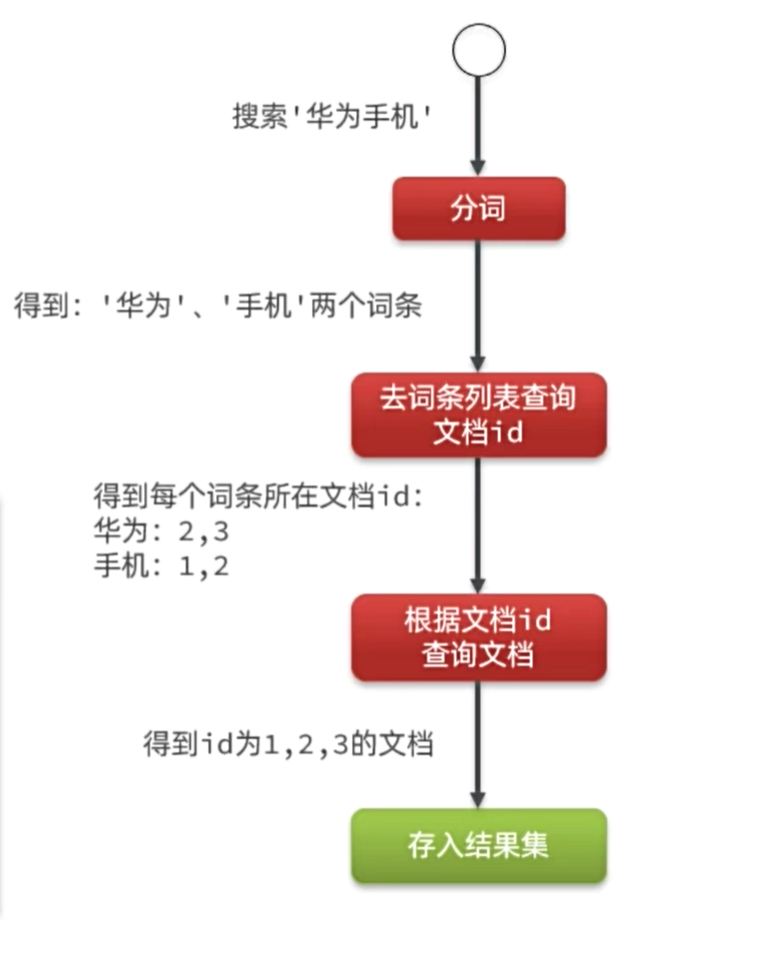
流程描述:
- 用户输入条件”华为手机”进行搜索。
- 对用户输入条件分词,得到词条:华为、手机。
- 拿着词条在倒排索引中查找(由于词条有索引,查询效率很高),即可得到包含词条的文档id:1、2、3。
- 拿着文档id到正向索引中查找具体文档即可(由于id也有索引,查询效率也很高)。
1.1.3 正向和倒排
- 正向索引是最传统的,根据id索引的方式。但根据词条查询时,必须先逐条获取每个文档,然后判断文档中是否包含所需要的词条,是根据文档找词条的过程。
- 而倒排索引则相反,是先找到用户要搜索的词条,根据词条得到保护词条的文档的id,然后根据id获取文档。是根据词条找文档的过程。
1.2 IK分词器
地址:https://github.com/medcl/elasticsearch-analysis-ik
IK分词器包含两种模式:
- ik_smart:智能语义切分
- ik_max_word:最细粒度切分
1
2
3
4
5
| POST /_analyze
{
"analyzer": "ik_smart",
"text": "黑马程序员学习java太棒了"
}
|
执行结果:
1
2
3
4
5
6
7
8
9
10
11
12
13
14
15
16
17
18
19
20
21
22
23
24
25
26
27
28
29
30
31
32
33
34
35
36
37
38
39
| {
"tokens" : [
{
"token" : "黑马",
"start_offset" : 0,
"end_offset" : 2,
"type" : "CN_WORD",
"position" : 0
},
{
"token" : "程序员",
"start_offset" : 2,
"end_offset" : 5,
"type" : "CN_WORD",
"position" : 1
},
{
"token" : "学习",
"start_offset" : 5,
"end_offset" : 7,
"type" : "CN_WORD",
"position" : 2
},
{
"token" : "java",
"start_offset" : 7,
"end_offset" : 11,
"type" : "ENGLISH",
"position" : 3
},
{
"token" : "太棒了",
"start_offset" : 11,
"end_offset" : 14,
"type" : "CN_WORD",
"position" : 4
}
]
}
|
拓展词典:
- 打开IK分词器config目录
- 在IKAnalyzer.cfg.xml配置文件内容添加
- 在IK分词器的config目录新建一个 ext.dic,可以参考config目录下复制一个配置文件进行修改
- 重启elasticsearch
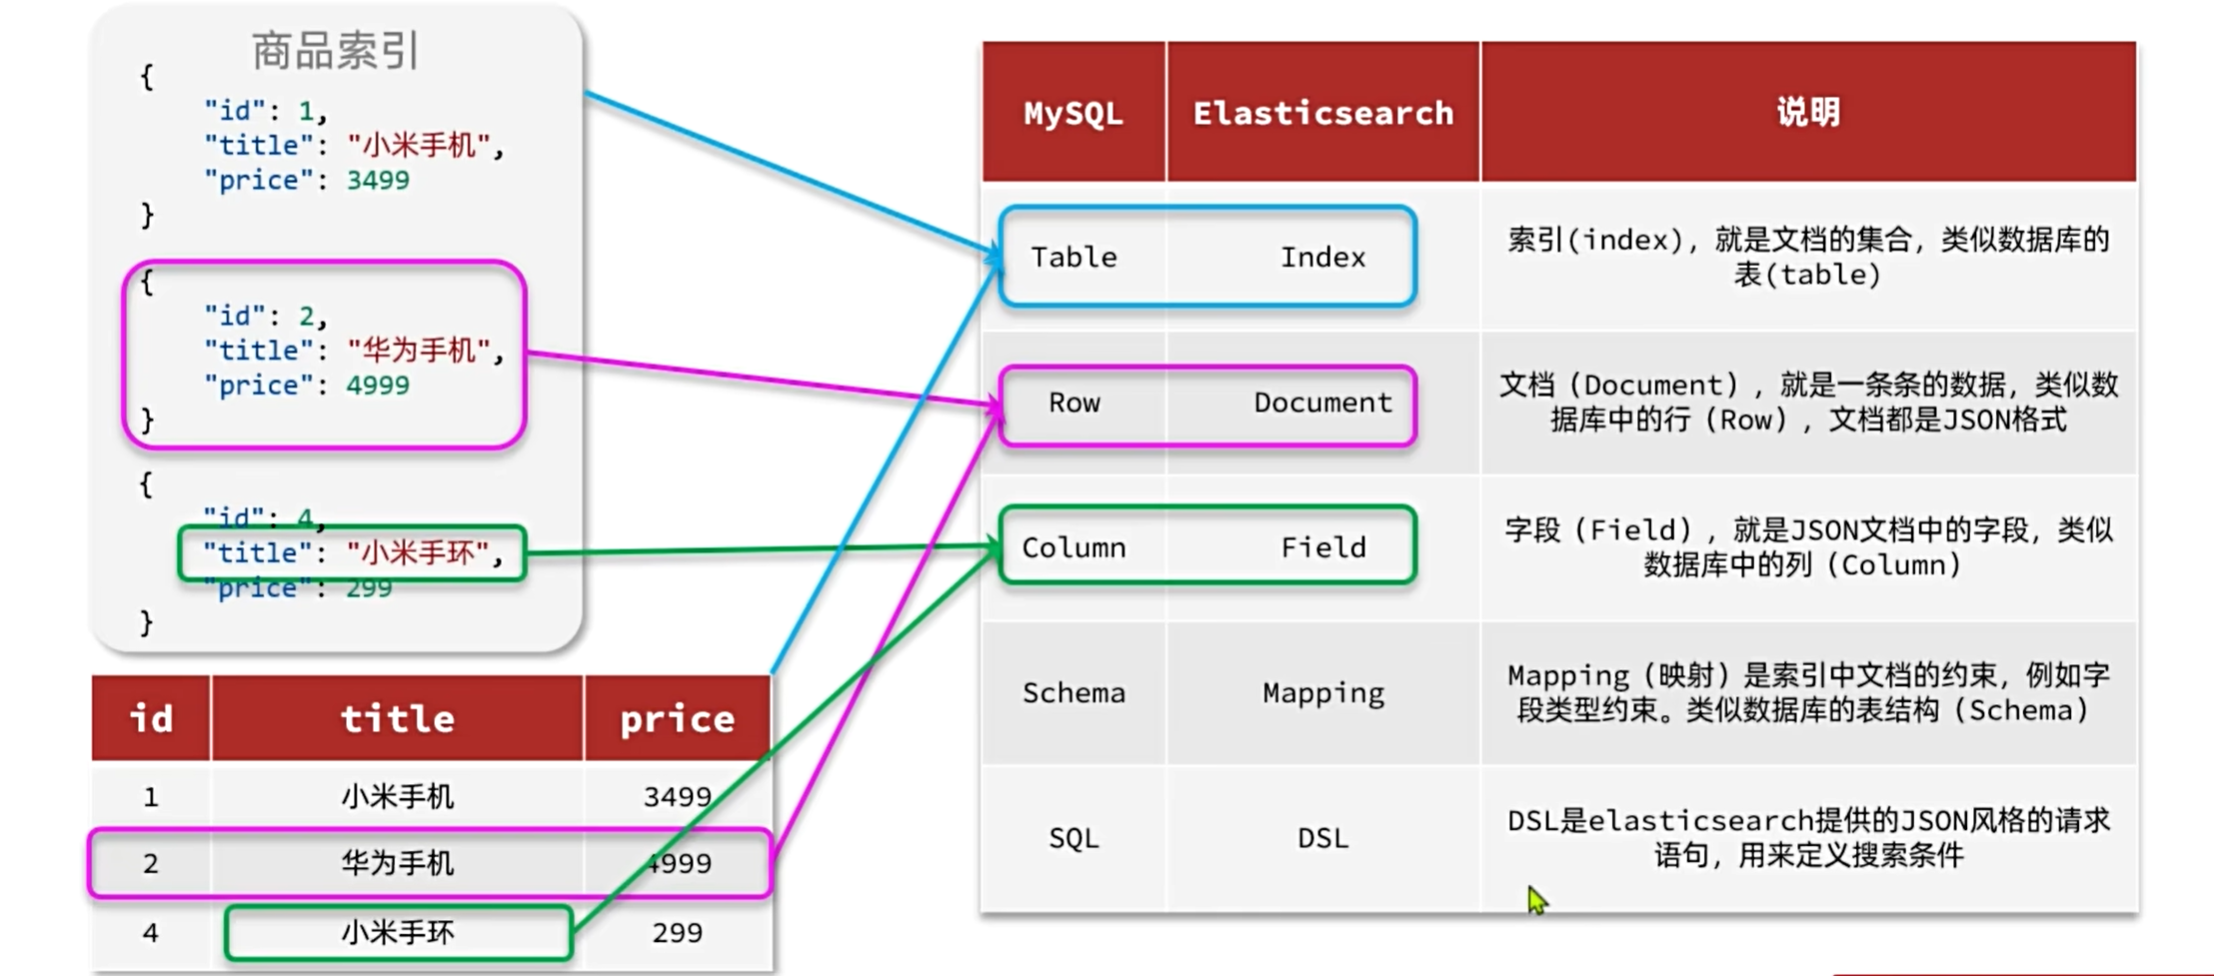
1.3 ES基础概念
elasticsearch是面向文档(Document)存储的,可以是数据库中的一条商品数据,一个订单信息。文档数据会被序列化为json格式后存储在elasticsearch中
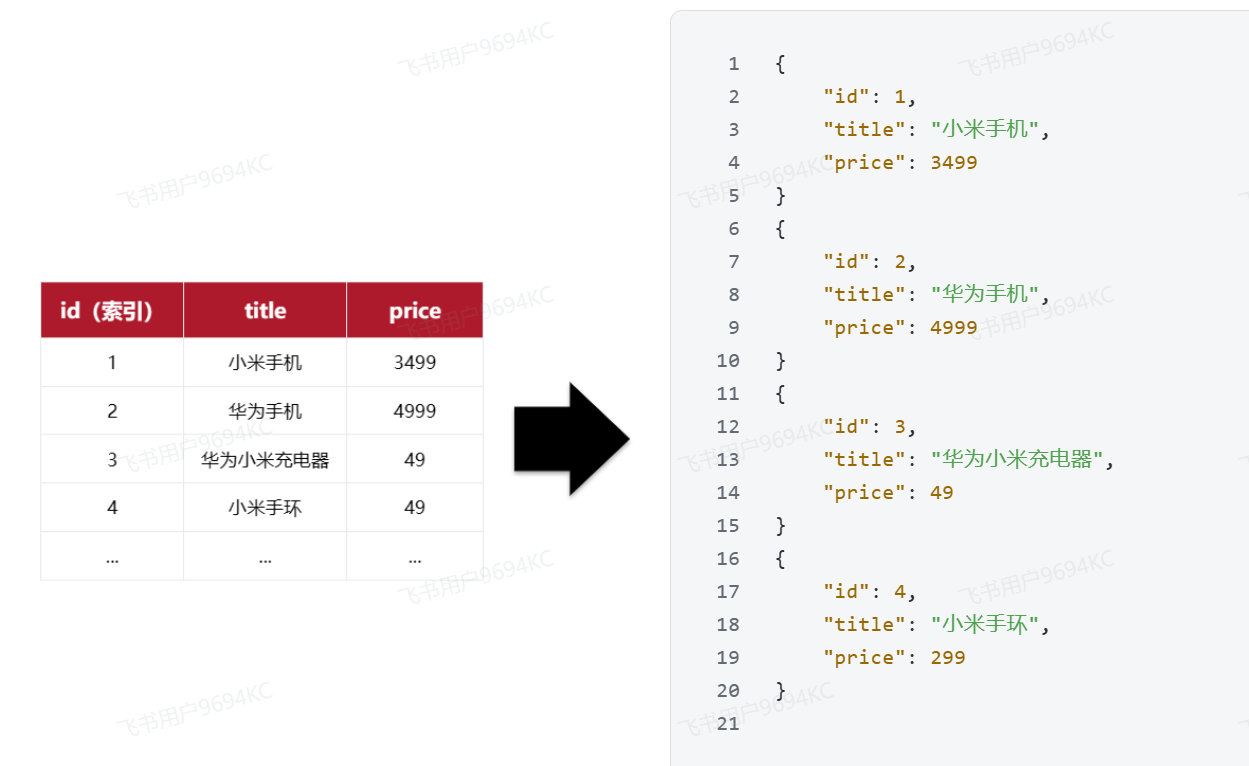
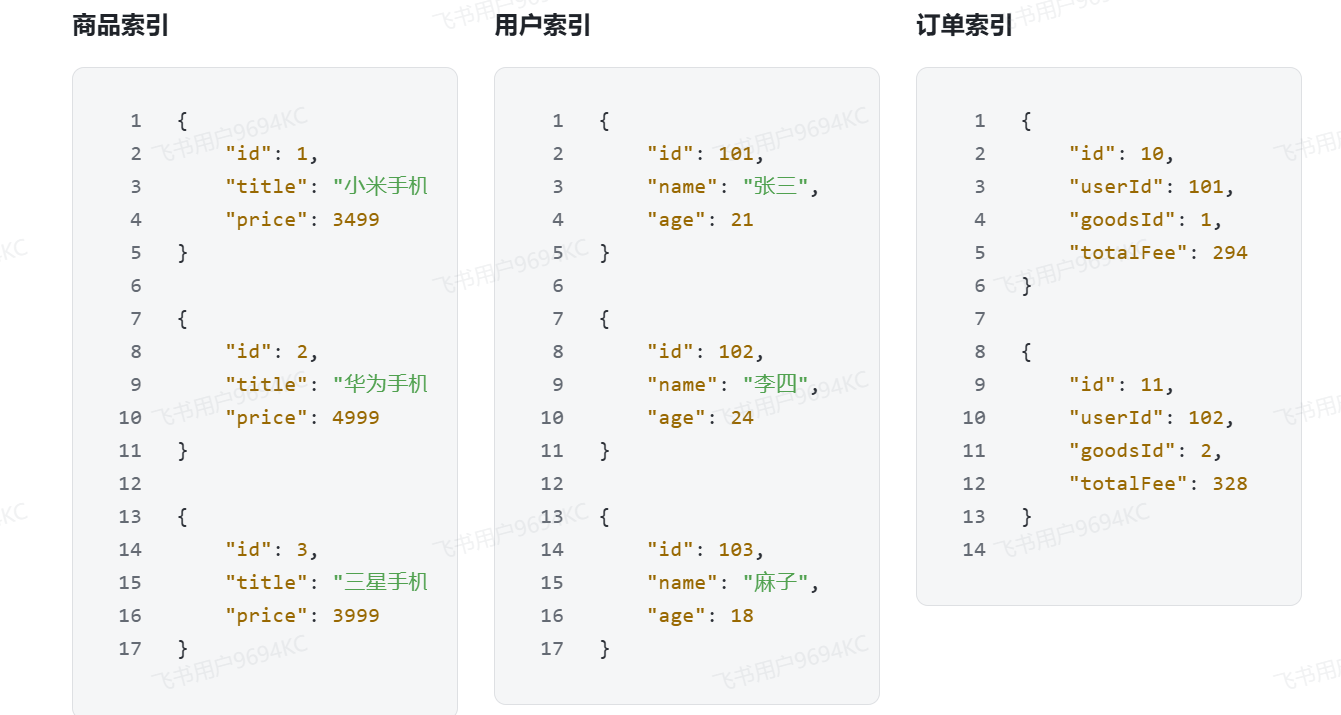
将类型相同的文档集中在一起管理,称为索引(Index)
MySQL和ES的对比:
- Mysql:擅长事务类型操作,可以确保数据的安全和一致性
- Elasticsearch:擅长海量数据的搜索、分析、计算
两者结合使用:
- 对安全性要求较高的写操作,使用mysql实现
- 对查询性能要求较高的搜索需求,使用elasticsearch实现
- 两者再基于某种方式,实现数据的同步,保证一致性
2. 索引库操作
Index就类似数据库表,Mapping映射就类似表的结构。我们要向es中存储数据,必须先创建Index和Mapping
2.1 Mapping映射属性
Mapping是对索引库中文档的约束,常见的Mapping属性包括:
- type:字段数据类型,常见的简单类型有:
- 字符串:text(可分词的文本)、keyword(精确值,例如:品牌、国家、ip地址)
- 数值:long、integer、short、byte、double、float、
- 布尔:boolean
- 日期:date
- 对象:object
- index:是否创建索引,默认为true
- analyzer:使用哪种分词器
- properties:该字段的子字段
2.2 索引库的增删改查
Elasticsearch采用的是Restful风格的API,而且请求参数也都采用JSON风格
| 接口类型 |
请求方式 |
请求路径 |
请求参数 |
| 查询用户 |
GET |
/users/{id} |
路径中的 id |
| 新增用户 |
POST |
/users |
json 格式 user 对象 |
| 修改用户 |
PUT |
/users/{id} |
路径中的 id
json 格式对象 |
| 删除用户 |
DELETE |
/users/{id} |
路径中的 id |
2.2.1 创建索引库
基本语法:
- 请求方式:PUT
- 请求路径:/索引库名,可以自定义
- 请求参数:mapping映射
格式:
1
2
3
4
5
6
7
8
9
10
11
12
13
14
15
16
17
18
19
20
21
22
23
| PUT /索引库名称
{
"mappings": {
"properties": {
"字段名":{
"type": "text",
"analyzer": "ik_smart"
},
"字段名2":{
"type": "keyword",
"index": "false"
},
"字段名3":{
"properties": {
"子字段": {
"type": "keyword"
}
}
},
}
}
}
|
示例:
1
2
3
4
5
6
7
8
9
10
11
12
13
14
15
16
17
18
19
20
21
22
| # PUT /heima
{
"mappings": {
"properties": {
"info":{
"type": "text",
"analyzer": "ik_smart"
},
"email":{
"type": "keyword",
"index": "false"
},
"name":{
"properties": {
"firstName": {
"type": "keyword"
}
}
}
}
}
}
|
2.2.2 查询、删除索引库
2.2.3 修改索引库
索引库一旦创建,无法修改mapping。但是却允许添加新的字段到mapping中
语法:
1
2
3
4
5
6
7
8
| PUT /索引库名/_mapping
{
"properties": {
"新字段名":{
"type": "integer"
}
}
}
|
示例:
1
2
3
4
5
6
7
8
| PUT /heima/_mapping
{
"properties": {
"age":{
"type": "integer"
}
}
}
|
3. 文档操作
有了索引库,接下来就可以向索引库的文档中添加数据了。
3.1 新增文档
1
2
3
4
5
6
7
8
9
| POST /索引库名/_doc/文档id
{
"字段1": "值1",
"字段2": "值2",
"字段3": {
"子属性1": "值3",
"子属性2": "值4"
},
}
|
3.2 查询文档
3.3 删除文档
3.4 修改文档
修改有两种方式:
- 全量修改:直接覆盖原来的文档
- 局部修改:修改文档中的部分字段
3.4.1 全量修改
全量修改是覆盖原来的文档,其本质是两步操作:
1
2
3
4
5
6
| PUT /{索引库名}/_doc/文档id
{
"字段1": "值1",
"字段2": "值2",
}
|
3.4.2 局部修改
局部修改是只修改指定id匹配的文档中的部分字段
1
2
3
4
5
6
| POST /{索引库名}/_update/文档id
{
"doc": {
"字段名": "新的值",
}
}
|
3.5 批处理
批处理采用POST请求,基本语法如下
1
2
3
4
5
6
7
8
| POST _bulk
{ "index" : { "_index" : "test", "_id" : "1" } }
{ "field1" : "value1" }
{ "delete" : { "_index" : "test", "_id" : "2" } }
{ "create" : { "_index" : "test", "_id" : "3" } }
{ "field1" : "value3" }
{ "update" : {"_id" : "1", "_index" : "test"} }
{ "doc" : {"field2" : "value2"} }
|
- index代表新增操作
- _index:指定索引库名
- _id指定要操作的文档id
- { “field1” : “value1” }:则是要新增的文档内容
- delete代表删除操作
- _index:指定索引库名
- _id指定要操作的文档id
- update代表更新操作
- _index:指定索引库名
- _id指定要操作的文档id
- { “doc” : {“field2” : “value2”} }:要更新的文档字段
3.6 案例
1
2
3
4
5
6
7
8
9
10
11
12
13
14
15
16
17
18
19
20
21
22
23
24
25
26
27
28
29
30
31
32
33
34
35
36
37
38
39
40
41
42
43
44
45
46
47
| # 新增文档
POST /heima/_doc/1
{
"info": "黑马程序员Java讲师",
"email": "zy@itcast.cn",
"name": {
"firstName": "云",
"lastName": "赵"
}
}
# 查询文档
GET /heima/_doc/1
# 删除文档
DELETE /heima/_doc/1
# 全量修改文档
PUT /heima/_doc/1
{
"info": "黑马程序员高级Java讲师",
"email": "zy@itcast.cn",
"name": {
"firstName": "云",
"lastName": "赵"
}
}
# 局部修改文档
POST /heima/_update/1
{
"doc": {
"email": "ZhaoYun@itcast.cn"
}
}
# 批量新增文档
POST /_bulk
{"index": {"_index":"heima", "_id": "3"}}
{"info": "黑马程序员C++讲师", "email": "ww@itcast.cn", "name":{"firstName": "五", "lastName":"王"}}
{"index": {"_index":"heima", "_id": "4"}}
{"info": "黑马程序员前端讲师", "email": "zhangsan@itcast.cn", "name":{"firstName": "三", "lastName":"张"}}
# 批量删除文档
POST /_bulk
{"delete":{"_index":"heima", "_id": "3"}}
{"delete":{"_index":"heima", "_id": "4"}}
|
4. JavaRestClient
4.1 客户端初始化RestClient
- 在item-service模块中引入es的RestHighLevelClient依赖:
1
2
3
4
| <dependency>
<groupId>org.elasticsearch.client</groupId>
<artifactId>elasticsearch-rest-high-level-client</artifactId>
</dependency>
|
- 因为SpringBoot默认的ES版本是7.17.10,所以我们需要覆盖默认的ES版本:
1
2
3
4
5
| <properties>
<maven.compiler.source>11</maven.compiler.source>
<maven.compiler.target>11</maven.compiler.target>
<elasticsearch.version>7.12.1</elasticsearch.version>
</properties>
|
- 初始化RestHighLevelClient:
1
2
3
| RestHighLevelClient client = new RestHighLevelClient(RestClient.builder(
HttpHost.create("http://192.168.150.101:9200")
));
|
4.2 创建索引库
要实现对商品搜索,所以我们需要将商品添加到Elasticsearch中,不过需要根据搜索业务的需求来设定索引库结构,而不是一股脑的把MySQL数据写入Elasticsearch.
4.2.1 商品Mapping映射
结合数据库表结构,字段对应的mapping映射属性如下:

索引库文档结构:
1
2
3
4
5
6
7
8
9
10
11
12
13
14
15
16
17
18
19
20
21
22
23
24
25
26
27
28
29
30
31
32
33
34
35
36
37
38
39
40
41
42
43
| PUT /items
{
"mappings": {
"properties": {
"id": {
"type": "keyword"
},
"name":{
"type": "text",
"analyzer": "ik_max_word"
},
"price":{
"type": "integer"
},
"stock":{
"type": "integer"
},
"image":{
"type": "keyword",
"index": false
},
"category":{
"type": "keyword"
},
"brand":{
"type": "keyword"
},
"sold":{
"type": "integer"
},
"commentCount":{
"type": "integer",
"index": false
},
"isAD":{
"type": "boolean"
},
"updateTime":{
"type": "date"
}
}
}
}
|
4.2.2 在java中创建索引库
- 创建Request对象。
因为是创建索引库的操作,因此Request是CreateIndexRequest。
- 添加请求参数
其实就是Json格式的Mapping映射参数。因为json字符串很长,这里是定义了静态字符串常量MAPPING_TEMPLATE,让代码看起来更加优雅。
- 发送请求
client.indices()方法的返回值是IndicesClient类型,封装了所有与索引库操作有关的方法。例如创建索引、删除索引、判断索引是否存在等
1
2
3
4
5
6
7
8
9
10
11
12
13
14
15
16
17
18
19
20
21
22
23
24
25
26
27
28
29
30
31
32
33
34
35
36
37
38
39
40
41
42
43
44
45
46
47
48
49
50
51
| @Test
void testCreateIndex() throws IOException {
CreateIndexRequest request = new CreateIndexRequest("items");
request.source(MAPPING_TEMPLATE, XContentType.JSON);
client.indices().create(request, RequestOptions.DEFAULT);
}
static final String MAPPING_TEMPLATE = "{\n" +
" \"mappings\": {\n" +
" \"properties\": {\n" +
" \"id\": {\n" +
" \"type\": \"keyword\"\n" +
" },\n" +
" \"name\":{\n" +
" \"type\": \"text\",\n" +
" \"analyzer\": \"ik_max_word\"\n" +
" },\n" +
" \"price\":{\n" +
" \"type\": \"integer\"\n" +
" },\n" +
" \"stock\":{\n" +
" \"type\": \"integer\"\n" +
" },\n" +
" \"image\":{\n" +
" \"type\": \"keyword\",\n" +
" \"index\": false\n" +
" },\n" +
" \"category\":{\n" +
" \"type\": \"keyword\"\n" +
" },\n" +
" \"brand\":{\n" +
" \"type\": \"keyword\"\n" +
" },\n" +
" \"sold\":{\n" +
" \"type\": \"integer\"\n" +
" },\n" +
" \"commentCount\":{\n" +
" \"type\": \"integer\"\n" +
" },\n" +
" \"isAD\":{\n" +
" \"type\": \"boolean\"\n" +
" },\n" +
" \"updateTime\":{\n" +
" \"type\": \"date\"\n" +
" }\n" +
" }\n" +
" }\n" +
"}";
|
4.3 在java中删除和查询索引库
4.3.1 删除索引库
1
2
3
4
5
6
7
| @Test
void testDeleteIndex() throws IOException {
DeleteIndexRequest request = new DeleteIndexRequest("items");
client.indices().delete(request, RequestOptions.DEFAULT);
}
|
4.3.2 查询索引库
1
2
3
4
5
6
7
8
9
| @Test
void testExistsIndex() throws IOException {
GetIndexRequest request = new GetIndexRequest("items");
boolean exists = client.indices().exists(request, RequestOptions.DEFAULT);
System.err.println(exists ? "索引库已经存在!" : "索引库不存在!");
}
|
4.4 文档操作
4.4.1 新增文档
- 创建Request对象,这里是IndexRequest,因为添加文档就是创建倒排索引的过程
- 准备请求参数,本例中就是Json文档
- 发送请求
1
2
3
4
5
6
7
8
9
10
11
12
13
14
15
16
| @Test
void testAddDocument() throws IOException {
Item item = itemService.getById(100002644680L);
ItemDoc itemDoc = BeanUtil.copyProperties(item, ItemDoc.class);
String doc = JSONUtil.toJsonStr(itemDoc);
IndexRequest request = new IndexRequest("items").id(itemDoc.getId());
request.source(doc, XContentType.JSON);
client.index(request, RequestOptions.DEFAULT);
}
|
4.4.2 查询文档
1
2
3
4
5
6
7
8
9
10
11
12
| @Test
void testGetDocumentById() throws IOException {
GetRequest request = new GetRequest("items").id("100002644680");
GetResponse response = client.get(request, RequestOptions.DEFAULT);
String json = response.getSourceAsString();
ItemDoc itemDoc = JSONUtil.toBean(json, ItemDoc.class);
System.out.println("itemDoc= " + ItemDoc);
}
|
4.4.3 删除文档
1
2
3
4
5
6
7
| @Test
void testDeleteDocument() throws IOException {
DeleteRequest request = new DeleteRequest("item", "100002644680");
client.delete(request, RequestOptions.DEFAULT);
}
|
4.4.4 修改文档
- 全量修改:本质是先根据id删除,再新增
- 局部修改:修改文档中的指定字段值
我们主要关注局部修改的API:
1
2
3
4
5
6
7
8
9
10
11
12
| @Test
void testUpdateDocument() throws IOException {
UpdateRequest request = new UpdateRequest("items", "100002644680");
request.doc(
"price", 58800,
"commentCount", 1
);
client.update(request, RequestOptions.DEFAULT);
}
|
4.4.5 批量导入文档
Bulk中添加了多个IndexRequest,就是批量新增功能:
1
2
3
4
5
6
7
8
9
10
| @Test
void testBulk() throws IOException {
BulkRequest request = new BulkRequest();
request.add(new IndexRequest("items").id("1").source("json doc1", XContentType.JSON));
request.add(new IndexRequest("items").id("2").source("json doc2", XContentType.JSON));
client.bulk(request, RequestOptions.DEFAULT);
}
|
采用循环遍历方式,每次导入1000条左右的数据:
1
2
3
4
5
6
7
8
9
10
11
12
13
14
15
16
17
18
19
20
21
22
23
24
25
26
27
28
29
30
31
| @Test
void testLoadItemDocs() throws IOException {
int pageNo = 1;
int size = 1000;
while (true) {
Page<Item> page = itemService.lambdaQuery().eq(Item::getStatus, 1).page(new Page<Item>(pageNo, size));
List<Item> items = page.getRecords();
if (CollUtils.isEmpty(items)) {
return;
}
log.info("加载第{}页数据,共{}条", pageNo, items.size());
BulkRequest request = new BulkRequest("items");
for (Item item : items) {
ItemDoc itemDoc = BeanUtil.copyProperties(item, ItemDoc.class);
request.add(new IndexRequest()
.id(itemDoc.getId())
.source(JSONUtil.toJsonStr(itemDoc), XContentType.JSON));
}
client.bulk(request, RequestOptions.DEFAULT);
pageNo++;
}
}
|
5. DSL查询
Elasticsearch的查询可以分为两大类:
- 叶子查询(Leaf query clauses):一般是在特定的字段里查询特定值,属于简单查询,很少单独使用。
- 复合查询(Compound query clauses):以逻辑方式组合多个叶子查询或者更改叶子查询的行为方式。
5.1 叶子查询
叶子查询的类型:
- 全文检索查询(Full Text Queries):利用分词器对用户输入搜索条件先分词,得到词条,然后再利用倒排索引搜索词条。例如:
- 精确查询(Term-level queries):不对用户输入搜索条件分词,根据字段内容精确值匹配。但只能查找keyword、数值、日期、boolean类型的字段。例如:
- 地理坐标查询:用于搜索地理位置,搜索方式很多,例如:
- geo_bounding_box:按矩形搜索
- geo_distance:按点和半径搜索
5.1.1 全文检索查询
match语法:
1
2
3
4
5
6
7
8
| GET /{索引库名}/_search
{
"query": {
"match": {
"字段名": "搜索条件"
}
}
}
|
multi_match语法:
1
2
3
4
5
6
7
8
9
| GET /{索引库名}/_search
{
"query": {
"multi_match": {
"query": "搜索条件",
"fields": ["字段1", "字段2"]
}
}
}
|
示例:
1
2
3
4
5
6
7
8
9
| GET /items/_search
{
"query": {
"multi_match": {
"query": "华为",
"fields": ["name", "brand"]
}
}
}
|
5.1.2 精确查询
词条级别的查询;作为一个词条,与搜索的字段内容精确值匹配。因此推荐查找keyword、数值、日期、boolean类型的字段。
term查询:
1
2
3
4
5
6
7
8
9
10
| GET /{索引库名}/_search
{
"query": {
"term": {
"字段名": {
"value": "搜索条件"
}
}
}
}
|
range查询:
1
2
3
4
5
6
7
8
9
10
11
| GET /{索引库名}/_search
{
"query": {
"range": {
"字段名": {
"gte": {最小值},
"lte": {最大值}
}
}
}
}
|
5.2 复合查询
- 第一类:基于逻辑运算组合叶子查询,实现组合条件,例如
- 第二类:基于某种算法修改查询时的文档相关性算分,从而改变文档排名。例如:
bool查询
bool查询,即布尔查询。就是利用逻辑运算来组合一个或多个查询子句的组合。bool查询支持的逻辑运算有:
- must:必须匹配每个子查询,类似“与”
- should:选择性匹配子查询,类似“或”
- must_not:必须不匹配,不参与算分,类似“非”
- filter:必须匹配,不参与算分
语法:
1
2
3
4
5
6
7
8
9
10
11
12
13
14
15
16
17
18
19
20
| GET /items/_search
{
"query": {
"bool": {
"must": [
{"match": {"name": "手机"}}
],
"should": [
{"term": {"brand": { "value": "vivo" }}},
{"term": {"brand": { "value": "小米" }}}
],
"must_not": [
{"range": {"price": {"gte": 2500}}}
],
"filter": [
{"range": {"price": {"lte": 1000}}}
]
}
}
}
|
搜索手机,但品牌必须是华为,价格必须是900~1599:
1
2
3
4
5
6
7
8
9
10
11
12
13
14
| GET /items/_search
{
"query": {
"bool": {
"must": [
{"match": {"name": "手机"}}
],
"filter": [
{"term": {"brand": { "value": "华为" }}},
{"range": {"price": {"gte": 90000, "lt": 159900}}}
]
}
}
}
|
5.3 排序
elasticsearch默认是根据相关度算分(_score)来排序,但是也支持自定义方式对搜索结果排序。不过分词字段无法排序,能参与排序字段类型有:keyword类型、数值类型、地理坐标类型、日期类型等。
语法:
1
2
3
4
5
6
7
8
9
10
11
12
13
| GET /indexName/_search
{
"query": {
"match_all": {}
},
"sort": [
{
"排序字段": {
"order": "排序方式asc和desc"
}
}
]
}
|
按照商品价格排序:
1
2
3
4
5
6
7
8
9
10
11
12
13
| GET /items/_search
{
"query": {
"match_all": {}
},
"sort": [
{
"price": {
"order": "desc"
}
}
]
}
|
5.4 分页
elasticsearch 默认情况下只返回top10的数据。而如果要查询更多数据就需要修改分页参数了
5.4.1 基础分页
elasticsearch中通过修改from、size参数来控制要返回的分页结果:
- from:从第几个文档开始
- size:总共查询几个文档
1
2
3
4
5
6
7
8
9
10
11
12
13
14
15
| GET /items/_search
{
"query": {
"match_all": {}
},
"from": 0,
"size": 10,
"sort": [
{
"price": {
"order": "desc"
}
}
]
}
|
5.4.2 深度分页
elasticsearch的数据一般会采用分片存储,也就是把一个索引中的数据分成N份,存储到不同节点上。这种存储方式比较有利于数据扩展,但给分页带来了一些麻烦。
试想一下,假如我们现在要查询的是第999页数据呢,是不是要找第9990~10000的数据,那岂不是需要把每个分片中的前10000名数据都查询出来,汇总在一起,在内存中排序?如果查询的分页深度更深呢,需要一次检索的数据岂不是更多?

针对深度分页,elasticsearch提供了解决方案:
- search after:分页时需要排序,原理是从上一次的排序值开始,查询下一页数据。官方推荐使用的方式。
5.5 高亮
词条的高亮标签肯定是由服务端提供数据的时候已经加上的。
实现高亮的思路就是:
- 用户输入搜索关键字搜索数据
- 服务端根据搜索关键字到elasticsearch搜索,并给搜索结果中的关键字词条添加html标签
- 前端提前给约定好的html标签添加CSS样式
1
2
3
4
5
6
7
8
9
10
11
12
13
14
15
16
| GET /{索引库名}/_search
{
"query": {
"match": {
"搜索字段": "搜索关键字"
}
},
"highlight": {
"fields": {
"高亮字段名称": {
"pre_tags": "<em>",
"post_tags": "</em>"
}
}
}
}
|
6. JavaRestClient查询
6.1 文档搜索的基本步骤
- 创建SearchRequest对象
- 准备request.source(),也就是DSL。
- QueryBuilders来构建查询条件
- 传入request.source() 的 query() 方法
- 发送请求,得到结果
- 解析结果(参考JSON结果,从外到内,逐层解析)
1
2
3
4
5
6
7
8
9
10
11
12
13
14
15
16
17
18
19
20
21
22
23
24
25
26
27
| @Test
void testMatchAll() throws IOException {
SearchRequest request = new SearchRequest("items");
request.source().query(QueryBuilders.matchAllQuery());
SearchResponse response = client.search(request, RequestOptions.DEFAULT);
handleResponse(response);
}
private void handleResponse(SearchResponse response) {
SearchHits searchHits = response.getHits();
long total = searchHits.getTotalHits().value;
System.out.println("共搜索到" + total + "条数据");
SearchHit[] hits = searchHits.getHits();
for (SearchHit hit : hits) {
String source = hit.getSourceAsString();
ItemDoc item = JSONUtil.toBean(source, ItemDoc.class);
System.out.println(item);
}
}
|
6.2 叶子查询
match查询:
1
2
3
4
5
6
7
8
9
10
11
| @Test
void testMatch() throws IOException {
SearchRequest request = new SearchRequest("items");
request.source().query(QueryBuilders.matchQuery("name", "脱脂牛奶"));
SearchResponse response = client.search(request, RequestOptions.DEFAULT);
handleResponse(response);
}
|
multi_match查询:
1
2
3
4
5
6
7
8
9
10
11
| @Test
void testMultiMatch() throws IOException {
SearchRequest request = new SearchRequest("items");
request.source().query(QueryBuilders.multiMatchQuery("脱脂牛奶", "name", "category"));
SearchResponse response = client.search(request, RequestOptions.DEFAULT);
handleResponse(response);
}
|
range查询:
1
2
3
4
5
6
7
8
9
10
11
| @Test
void testRange() throws IOException {
SearchRequest request = new SearchRequest("items");
request.source().query(QueryBuilders.rangeQuery("price").gte(10000).lte(30000));
SearchResponse response = client.search(request, RequestOptions.DEFAULT);
handleResponse(response);
}
|
term查询:
1
2
3
4
5
6
7
8
9
10
11
| @Test
void testTerm() throws IOException {
SearchRequest request = new SearchRequest("items");
request.source().query(QueryBuilders.termQuery("brand", "华为"));
SearchResponse response = client.search(request, RequestOptions.DEFAULT);
handleResponse(response);
}
|
6.3 复合查询
1
2
3
4
5
6
7
8
9
10
11
12
13
14
15
16
17
18
19
| @Test
void testBool() throws IOException {
SearchRequest request = new SearchRequest("items");
BoolQueryBuilder bool = QueryBuilders.boolQuery();
bool.must(QueryBuilders.matchQuery("name", "脱脂牛奶"));
bool.filter(QueryBuilders.termQuery("brand", "德亚"));
bool.filter(QueryBuilders.rangeQuery("price").lte(30000));
request.source().query(bool);
SearchResponse response = client.search(request, RequestOptions.DEFAULT);
handleResponse(response);
}
|
6.4 排序和分页
1
2
3
4
5
6
7
8
9
10
11
12
13
14
15
16
17
18
| @Test
void testPageAndSort() throws IOException {
int pageNo = 1, pageSize = 5;
SearchRequest request = new SearchRequest("items");
request.source().query(QueryBuilders.matchQuery("name", "脱脂牛奶"));
request.source().sort("price", SortOrder.ASC);
request.source().from((pageNo - 1) * pageSize).size(pageSize);
SearchResponse response = client.search(request, RequestOptions.DEFAULT);
handleResponse(response);
}
|
6.5 高亮
- 条件同样是在request.source()中指定,只不过高亮条件要基于HighlightBuilder来构造
- 高亮响应结果与搜索的文档结果不在一起,需要单独解析
查询:
1
2
3
4
5
6
7
8
9
10
11
12
13
14
15
16
17
18
19
| @Test
void testHighlight() throws IOException {
SearchRequest request = new SearchRequest("items");
request.source().query(QueryBuilders.matchQuery("name", "脱脂牛奶"));
request.source().highlighter(
SearchSourceBuilder.highlight()
.field("name")
.preTags("<em>")
.postTags("</em>")
);
SearchResponse response = client.search(request, RequestOptions.DEFAULT);
handleResponse(response);
}
|
解析数据:
1
2
3
4
5
6
7
8
9
10
11
12
13
14
15
16
17
18
19
20
21
22
23
24
25
26
| private void handleResponse(SearchResponse response) {
SearchHits searchHits = response.getHits();
long total = searchHits.getTotalHits().value;
System.out.println("共搜索到" + total + "条数据");
SearchHit[] hits = searchHits.getHits();
for (SearchHit hit : hits) {
String source = hit.getSourceAsString();
ItemDoc item = JSONUtil.toBean(source, ItemDoc.class);
Map<String, HighlightField> hfs = hit.getHighlightFields();
if (CollUtils.isNotEmpty(hfs)) {
HighlightField hf = hfs.get("name");
if (hf != null) {
String hfName = hf.getFragments()[0].string();
item.setName(hfName);
}
}
System.out.println(item);
}
}
|
7. 数据聚合
7.1 聚合的概念
聚合(aggregations)可以让我们极其方便的实现对数据的统计、分析、运算
聚合常见的有三类:
- 桶(Bucket)聚合:用来对文档做分组
- TermAggregation:按照文档字段值分组,例如按照品牌值分组、按照国家分组
- Date Histogram:按照日期阶梯分组,例如一周为一组,或者一月为一组
- 度量(Metric)聚合:用以计算一些值,比如:最大值、最小值、平均值等
- Avg:求平均值
- Max:求最大值
- Min:求最小值
- Stats:同时求max、min、avg、sum等
- 管道(pipeline)聚合:其它聚合的结果为基础做进一步运算
注意:参加聚合的字段必须是keyword、日期、数值、布尔类型
7.2 DSL实现聚合
7.2.1 Bucket聚合
我们要统计所有商品中共有哪些商品分类,其实就是以分类(category)字段对数据分组
1
2
3
4
5
6
7
8
9
10
11
12
| GET /items/_search
{
"size": 0,
"aggs": {
"category_agg": {
"terms": {
"field": "category",
"size": 20
}
}
}
}
|
- size:设置size为0,就是每页查0条,则结果中就不包含文档,只包含聚合
- aggs:定义聚合
- category_agg:聚合名称,自定义,但不能重复
- terms:聚合的类型,按分类聚合,所以用term
- field:参与聚合的字段名称
- size:希望返回的聚合结果的最大数量
7.2.2 带条件聚合
价格高于3000元的手机品牌有哪些
1
2
3
4
5
6
7
8
9
10
11
12
13
14
15
16
17
18
19
20
21
22
23
24
25
26
27
28
29
30
| GET /items/_search
{
"query": {
"bool": {
"filter": [
{
"term": {
"category": "手机"
}
},
{
"range": {
"price": {
"gte": 300000
}
}
}
]
}
},
"size": 0,
"aggs": {
"brand_agg": {
"terms": {
"field": "brand",
"size": 20
}
}
}
}
|
7.2.3 Metric聚合
我们需要对桶内的商品做运算,获取每个品牌价格的最小值、最大值、平均值。
1
2
3
4
5
6
7
8
9
10
11
12
13
14
15
16
17
18
19
20
21
22
23
24
25
26
27
28
29
30
31
32
33
34
35
36
37
| GET /items/_search
{
"query": {
"bool": {
"filter": [
{
"term": {
"category": "手机"
}
},
{
"range": {
"price": {
"gte": 300000
}
}
}
]
}
},
"size": 0,
"aggs": {
"brand_agg": {
"terms": {
"field": "brand",
"size": 20
},
"aggs": {
"stats_meric": {
"stats": {
"field": "price"
}
}
}
}
}
}
|
- stats_meric:聚合名称
- stats:聚合类型,stats是metric聚合的一种
- field:聚合字段,这里选择price,统计价格
7.3 JavaRestClient实现聚合
1
2
3
4
5
6
7
8
9
10
11
12
13
14
15
16
17
18
19
20
21
22
23
24
25
26
27
28
29
30
31
32
33
| @Test
void testAgg() throws IOException {
SearchRequest request = new SearchRequest("items");
BoolQueryBuilder bool = QueryBuilders.boolQuery()
.filter(QueryBuilders.termQuery("category", "手机"))
.filter(QueryBuilders.rangeQuery("price").gte(300000));
request.source().query(bool).size(0);
request.source().aggregation(
AggregationBuilders.terms("brand_agg").field("brand").size(5)
);
SearchResponse response = client.search(request, RequestOptions.DEFAULT);
Aggregations aggregations = response.getAggregations();
Terms brandTerms = aggregations.get("brand_agg");
List<? extends Terms.Bucket> buckets = brandTerms.getBuckets();
for (Terms.Bucket bucket : buckets) {
String brand = bucket.getKeyAsString();
System.out.print("brand = " + brand);
long count = bucket.getDocCount();
System.out.println("; count = " + count);
}
}
|
参考文献:https://b11et3un53m.feishu.cn/wiki/LDLew5xnDiDv7Qk2uPwcoeNpngf
END